For the next few weeks I am going to be focusing on using pilates to correct poor posture. Poor posture is a sign of imbalance in the body. We can correct this imbalance be using a combination of specific exercises and stretches to target the affected areas. Before we start, please be aware that you can exhibit more than one of the postural types (it is relatively common to be both lordotic and kyphotic at the same time), and it is fine to tailor your exercise program to address more than one problem area 🙂
This week we will start with discussing KYPHOSIS. Kyphosis is characterised by a rounding of the upper back, and often a jutting forward of the chin. A lot of jobs have us hunching forward during the day, whether over a desk/computer, leaning over another person while we cut their hair, or bending over to get down to the level of small children. This posture is also very common in women where the weight of their breasts pull them forward. To correct this we need to both strengthen the upper back, and stretch the front of the body in the abs, pecs and lats. A combination of chin tucks and neck stretches helps with the jutting chin.
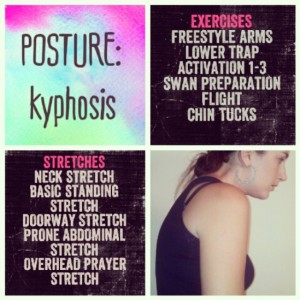
POSTURE: kyphosis
If you’re not sure if you are kyphotic or not, look for the following:
- chin poking out
- head sitting forward of the body
- shoulder blades sticking out
- shoulders rolling forward
- upper back looks rounded
The photo above is exaggerated, but it shows what to look for.
So what’s the problem with having this type of posture? No, it’s not that it doesn’t look pretty in a strapless dress 😉 Kyphotic posture can cause pain in the back and neck, headaches, nerve pain, and in severe cases can also be responsible for breathing difficulties! This is because the hunching is restricting the area the lungs have to expand. At this point I think it is important to point out that I am specifically addressing postural kyphosis. There are other causes including Scheuerman’s disease, osteoporosis, infection and tumor. If there is any pain, fatigue or breathing difficulties, or if you believe there is something just not right, please see your doctor for an assessment. There is no harm in seeing your GP just in case, so please book a visit if you are concerned or unsure 🙂
To start with the exercises, we have looked at all of these in the past except the chin tucks…so here they are 🙂
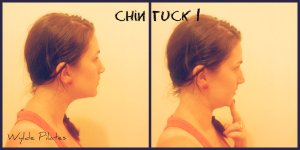
CHIN TUCK: upright
Basically we are just deliberately tucking the chin without moving the head. It is almost a nodding action. You can use the fingers to guide the movement, but make sure you are engaging the muscles in the neck to initiate the movement.
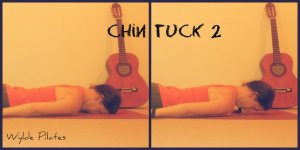
CHIN TUCK: prone
This one may be a little more difficult if the neck is particularly weak, but it does have the added benefit of gravity providing a little resistance to work against…and we all know that resistance is hugely beneficial when it comes to strengthening muscles (pilates reformer anyone?). Start lying relaxed on the stomach with the head resting on the floor, lift the head and tuck the chin WITHOUT moving the back or shoulders.
For both of these, repeat at least 10 times. You may like to include Chin Tuck 2 in your workout, and use Chin Tuck 1 throughout the day when you notice you are sticking your chin out again 🙂
For the others, have a look back through the blog. I have just added a search function to the sidebar (on the left of the screen) to make it easy for you. Just type the name of the exercise and voila!
Now for the stretches:
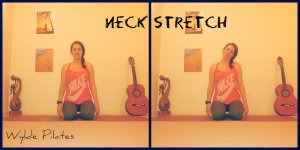
NECK STRETCH
You can do this one sitting or standing. Starting with the neck in a neutral position draw the right ear towards the right shoulder. Ensure you don’t allow the shoulder to come up towards the ear. To increase the stretch extend the fingers of the opposite (i.e. left in this case) down towards the ground. Avoid pulling the head to increase the stretch. Do NOT force the neck to stretch further than is comfortable. Stop if there is pain, or if it is increasing the intensity of a headache. Hold for 5-10 breaths and repeat on the opposite side.
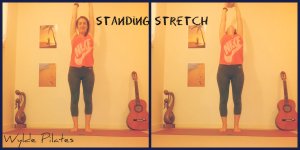
BASIC STANDING STRETCH
Standing with the feet shoulder width apart, spine in neutral. Extend the arms above the head and then allow the back and neck to bend back as far as is comfortable. This will stretch the lower back, the upper abdominal area and the front of the neck. Do not stretch further than is comfortable. There should be no pain. Hold for 5-10 breaths.
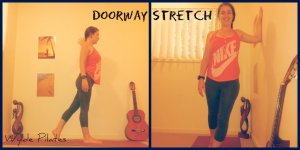
DOORWAY STRETCH
You can do this stretch leaning through a doorway with the arm of the door frame, or against a wall like I have pictured here. Bend the elbow at a right angle and place it against the wall so that the elbow is in line with the shoulder. Place one foot in front of the other (it doesn’t matter which. Try both and see which feels best for you), allow your weight to lean in to the wall as you lean slightly forward, and turn the body out from the wall a little. This acts to open up the chest. Hold for 5-10 breaths and repeat on the opposite side.
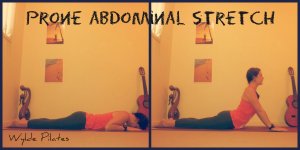
ABDOMINAL STRETCH: prone
If you are into yoga, you may know this as cobra pose. Begin lying on the stomach with the hands alongside the head. Push up on to your elbows so that the chest comes off the floor. If you feel like stretching further, straighten the arms to increase the stretch. Breathe to relax into the stretch. Hold for 5-10 breaths.
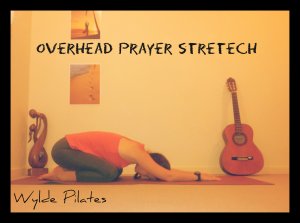
PRAYER STRETCH: overhead
Another stretch common to yoga 🙂 In yoga this would be called child’s pose, in pilates it is known as prayer stretch: overhead modification. By extending the arms overhead, the stretch is concentrated into the shoulder and lat area (the muscle that runs along the side of the upper body). Begin in kneeling, lower the bottom to the feet and fold the body forward, extending the arms above the head. To increase the stretch, lower the bottom further toward the feet and extend the arms further. As with all stretches, only sink as far into the stretch as is comfortable for YOUR body. Hold for 5-10 breaths. Please avoid this one if you have issues with bulging disc in the spine, etc
So something a bit different this week, but definitely worthwhile. Pilates is all about BALANCE in the body. By balancing our muscles, we correct our posture. This helps to avoid injury, relieve pain and make our movements more efficient. Please remember that postural problems take a long time to manifest, so they can take time to correct. Stick with it and you will feel the difference even before you can see it!
Next week we will look at lordosis, or the increased arch in the lower back.
WORK HARD, WORK SAFE.
Take care lovelies
❤ Kiki


